Running PonyOS on real hardware for fun and profit
Written on .
Final exams are creeping closer day to day. And what's better use of my time than running PonyOS on real hardware?
If you don't know what PonyOS is, it's a hobby Unix-like operating system. And it is delightful! If you didn't read about it, go check it out. Like, . Come back when you read it. It's awesome thing.

My attempt to boot PonyOS
Apart from the stunning visuals, there is something that differs PonyOS from yet another ubuntu-based distribution. PonyOS is built from scratch and it has it's own kernel - it's not Linux!
It's pretty clear what we're going to do. We are going to take this operating system, which was built to run in virtualbox, and run it on real hardware. Because running this on virtual machine just doesn't have the feeling of ultimate hapiness you'll experience. Even if you map Ctrl+Alt to change keyboard layout in X so you can't ungrab your mouse from virtualbox window, so you're trapped inside and are forced to (actually just , then you can switch to another terminal) and can't get out of PonyOS by normal means, running it on your real hardware just feels . Even just for the respectful silence when you amaze your friends with your distro () choice.
So let's jump right into it. Download ponyos and we can begin. It's important which version will you download. In my testing, version 5 worked pretty much out of the box after I hacked grub a bit. Version would require different way to boot it so I didn't try (but it should work) and trying to boot version enters infinite loop or something like that. So I recommend version for hassle-free experience and later try to boot (you will have to dig into grub a bit). If you manage to do it, let me know! Version has many features I would love to have on my computer.
Running it isn't that hard. Simply use qemu or or any other virtual machine and throw file at it. It will boot, it will run and it will be awesome. But we want to run it real hardware.
So how are we going to do this? Well, we could copy it to its own partition and then just run it somehow, right? So lets try it. This is what I've done:
% sudo dd if=~/Downloads/ponyos.iso of=/dev/disk/by-partlabel/PonyOS bs=4M conv=noerror,sync status=progress<br/>NO YOU IDIOT. Shutting down.<br/>^C<br/>Wait what?
% alias dd<br/>dd='echo '\''NO YOU IDIOT. Shutting down.'\''; sleep 2; poweroff'<br/>Oh. Yeah, I forgot. I once tried to use dd directly to play with partitions and nuked my partition table. And lost 7 months of data. Because who needs backups, right?
% sudo \dd if=~/Downloads/ponyos.iso of=/dev/disk/by-partlabel/PonyOS bs=4M conv=noerror,sync status=progress<br/>% qemu /dev/disk/by-partlabel/PonyOS<br/>Yeah, this looks good. This actually boots! Note: the /by-partlabel thing is awesome feature that I didn't know existed until my disaster. It turns out you can specify disks with many different ways. So if you use this, you'll never accidentally mistype instead of .See .
Mayyybeeee theoretically it's grub in there, right? So if we just run os-prober...
% sudo os-prober<br/>/dev/nvme0n1p1@/EFI/Microsoft/Boot/bootmgfw.efi:Windows Boot Manager:Windows:efi<br/>/dev/sda2:Manjaro Linux (20.0):ManjaroLinux:linux<br/>/dev/sda3:Arch Linux:Arch:linux<br/>No, nevermind. That would be too easy. If this worked, this would generate grub configuration on their own. It looks like we will have to write our own grub menu entry. So let's learn how grub works!
Open /boot/grub/grub.cfg (or whatever your config location is) and see what's in there. Section that boots Windows bootloader (it's probably the most simple section you'll have there) looks like this:
menuentry 'Windows Boot Manager (on /dev/nvme0n1p1)' --class windows --class os $menuentry_id_option 'osprober-efi-202C-5D55' {<br/> insmod part_gpt<br/> insmod fat<br/> if [ x$feature_platform_search_hint = xy ]; then<br/> search --no-floppy --fs-uuid --set=root 202C-5D55<br/> else<br/> search --no-floppy --fs-uuid --set=root 202C-5D55<br/> fi<br/> chainloader /EFI/Microsoft/Boot/bootmgfw.efi<br/>}<br/>Note: The best way to learn about grub is to play. Reboot, enter GRUB command line, and press tab to see commands. ls works. You can use things like to specify path. This is the way to specify partitions: (may be without , but pressing Tab helps). So for example works exactly as you thing it works.
So what do we have there in the config file. This looks like the thing that executes when we select the 'Windows Boot Manager' option in grub menu when booting. Ok, so on the first line is a name, some classes, that doesn't interest us. Then in the menu block, it probably loads some modules, sets a variable or something like that, and then chainloads a file. The file is windows bootloader. This looks interesting. Maybe we could use it! The ponyos image has a bootloader, grub! So maybe if we chainload it... Let's try. If you read the whole config file, you know that we should write our own menu entries into /etc/grub.d/40_custom file (don't overwrite it, just append!) and then issue . So maybe something like this will work?
menuentry 'PonyOS' {<br/> chainloader (hw0,gpt6)+1<br/>}<br/>The +1 specifies to start reading from first segment. And this won't work. Maybe if we do ? No, this doesn't work either. It just can't find anything to execute. Let's see how the file actually looks like.
% mkdir pony<br/>% sudo mount ~/Downloads/ponyos.iso pony/<br/>% cd pony && ls<br/>boot boot.catalog kernel.gz mod ramdisk.img.gz wallpaper.png<br/>% cd boot/grub && ls<br/>fonts grub.cfg i386-pc locale menus.cfg modules.cfg roms theme.txt<br/>Interesting. So there is a kernel, some ramdisk and so on. I have no idea how to boot this. But there is grub.cfg! This is grub config file! If we somehow manage to copy this into our menu entry, it would magically work! Let's see what's actually in the config file.
There are loads of imports, modules, conditions and functions. But the last line looks interesting.
% tail -1 grub.cfg<br/>configfile /boot/grub/menus.cfg<br/>Oh. So this might load configuration file? This would solve our problem! Let's see. Grub documentation:
Command: configfile file

    Load file as a configuration file. If file defines any menu entries, then show a menu containing them immediately. Any environment variable changes made by the commands in file will not be preserved after configfile returns.
This is interesting. So we could just add configfile to our menu entry. However, how do we find the file? And furthermore, how do we assure that it will work? If we look at PonyOs config file, there are loads of paths like /boot/something. The root here is clearly the root of the file, so it would not work if we just loaded it. One option is to write some crazy sed, then debug it, and generally waste a lot of time. The other option is to set the root to something else.
menuentry 'PonyOS' {<br/> set root="some/path/to/iso/file/root"<br/> configfile "/boot/grub/grub.cfg" # We are already using new root here<br/>}<br/>How do we set root? Well, first we need to tell grub to load the isofile. A bit of ducking later, I came up with this.
menuentry "PonyOs" {<br/> set isofile="/path/to/ponyos.iso"<br/> loopback loop $isofile<br/> set root="(loop)"<br/> configfile "/boot/grub/grub.cfg"<br/>}<br/>This looks pretty good. The isofile is just a variable. It's cleaner this way. We then load the isofile, set root to it and execute the config file. This looks pretty good. However, where is the iso file? Well, we could just move it to somewhere when grub can find it easily, right? If we look at our original grub config file, we notice that grub is loading loads of things from . So we put our iso file there as well!
% sudo cp ~/Downloads/ponyos.iso /boot<br/>So what we have now in /etc/grub.d/40_custom is:
#!/bin/sh<br/>exec tail -n +3 $0<br/># This file provides an easy way to add custom menu entries. Simply type the<br/># menu entries you want to add after this comment. Be careful not to change<br/># the 'exec tail' line above.<br/>menuentry "Pony OS" {<br/> set isofile="/boot/ponyos.iso"<br/> loopback loop $isofile<br/> set root="(loop)"<br/> configfile "/boot/grub/grub.cfg"<br/>}<br/>So let's add it to main config file # grub-mkconfig -o /boot/grub/grub.cfg and reboot! We are greeted with a miracle.
Oh. Crap.
Well, I guess I just won't spend hours trying to make a fucking not-even-linux I'll try my older computer. My bios doesn't allow me to switch to legacy boot mode (without formatting my disks for some reason), but maybe on my other computer...
And yes, this works!
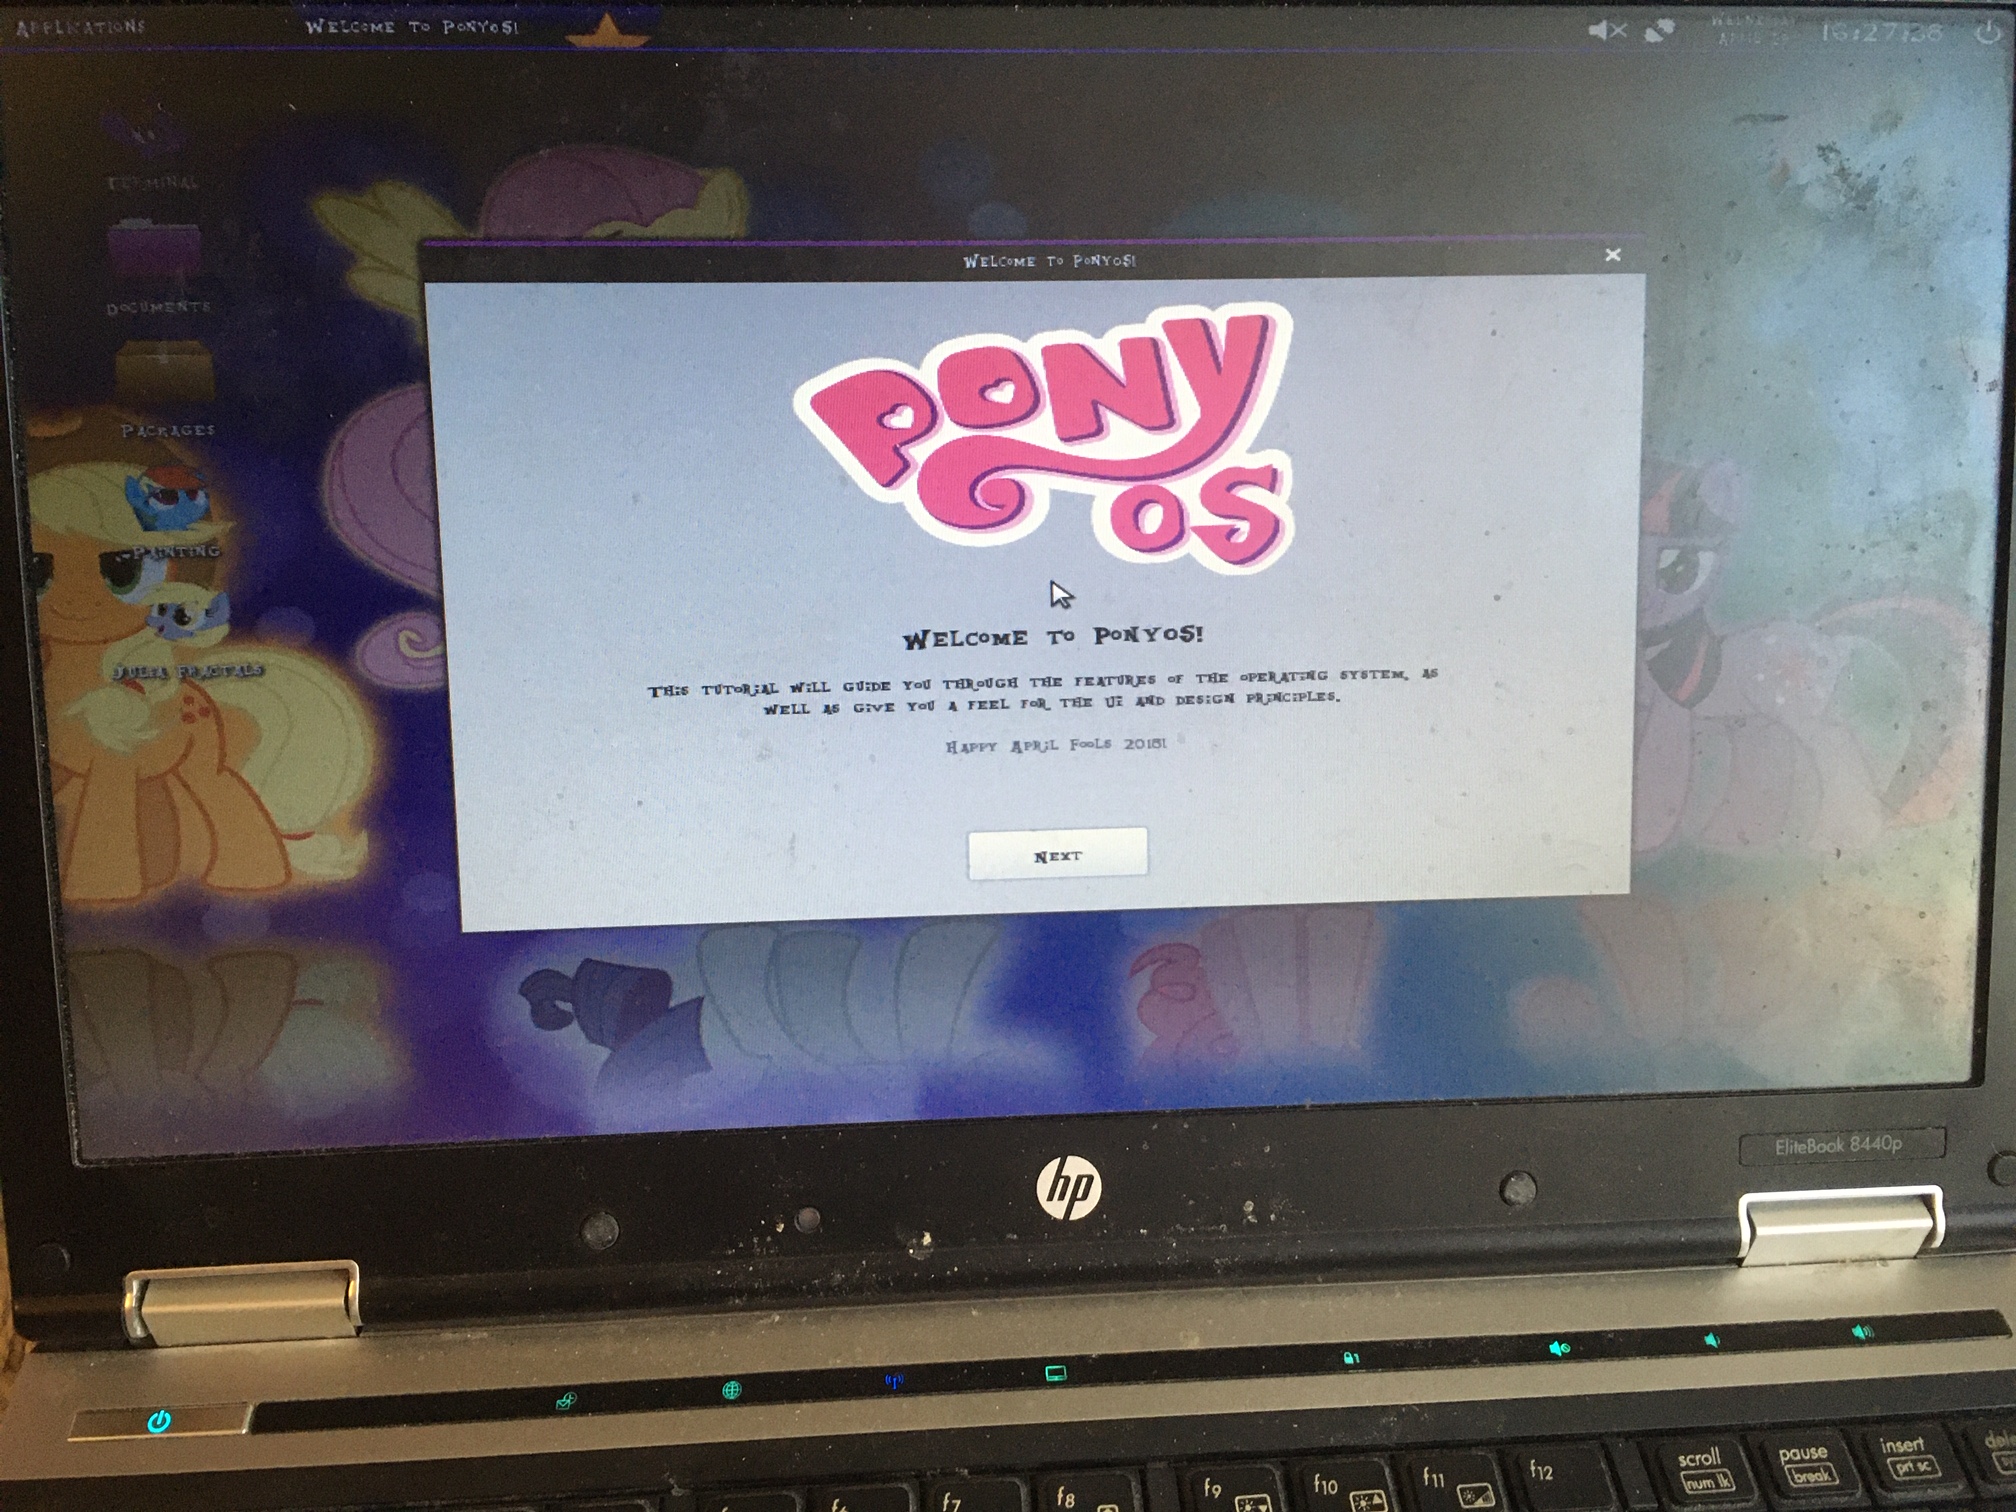
It turns out PonyOS requires legacy bios support to run, which makes sense.
Well, that's it. We learned a bit about GRUB and made our own entry in it, which loads PonyOS and actually runs it. Network still doesn't work (at least for me) and it isn't persistent which is something I wanted to do a lot, but that'll have to wait until the next time. Maybe I'll get version 6 to work after exams.